Thursday, April 3, 2014

Livin' in a Ghoul's Paradise

My plan to write this 2-Page Dungeon at Gary Con was definitely too optimistic.  Zero downtime there with all of the great gaming and great gamers to meet.  I've finally gotten around to it though.  Inspired by +Mike Evans 's post on alternate Ghoul Effects, the stats for the denizens of Ghoul's Paradise are for the DCC RPG, but should not be very hard to convert on the fly to any old school system or retro-clone.  I hope you enjoy!

Ghoul's Paradise 2 Page Dungeon .PDF


A powerful Ghoul Master named Mordech has set up a lair for himself and his followers/progeny in the catacombs beneath an abandoned temple.  The Master is also a devotee of a powerful, but fickle, demon-lord named Uzobzesus, who grants the Master powers and may also demand retribution or recompense from anyone who destroys his servant.

Below is a table to generate unique effects of Ghoul bit attacks.  The Judge should feel free to roll randomly for each Ghoul encountered or created during the adventure.  Suggestions for the ghouls that are currently part of the pack are listed in the room entries.


Alternate Ghoul Bite Effects Table (Roll 1d6+Ghould HD)

3.  Target believes he or she has been turned undead.  Will save DC 14 each day to shake off the effect.
4.  Will save DC 14 every round or target loses all actions due to uncontrollable vomiting of black oily mucous.
5.  Target's hair turns white permanently.
6.  Random limb is paralyzed for 1d6 hours.
7.  Bite causes  a wound that becomes infected with writhing maggots (-2 Agility).  The maggots mature in 2d2 days causing 2d7 points of damage per day as they eat the host from within.  Magical healing will kill the maggots.
8.Normal Paralysis Effect.
9.  Normal Paralysis Effect and Target ages 3d5 years.
10.  Target's skin erupts in painful hives (-4 Agility, -2 Stamina) until magically healed.  After healing Fort save DC 14 or Stamina damage is permanent.
11.  Target's flesh begins to putrefy and slough off causing 2d6 damage immediately and a cumulative 1d6 damage per day until magically healed (e.g. day 2 - 3d6 damage, day 3 - 4d6, etc.).

12.  Normal Paralysis and the target's skin dries out and pulls tight in an imitation of death (-2d3 Personality and -1d2 Agility permanently).

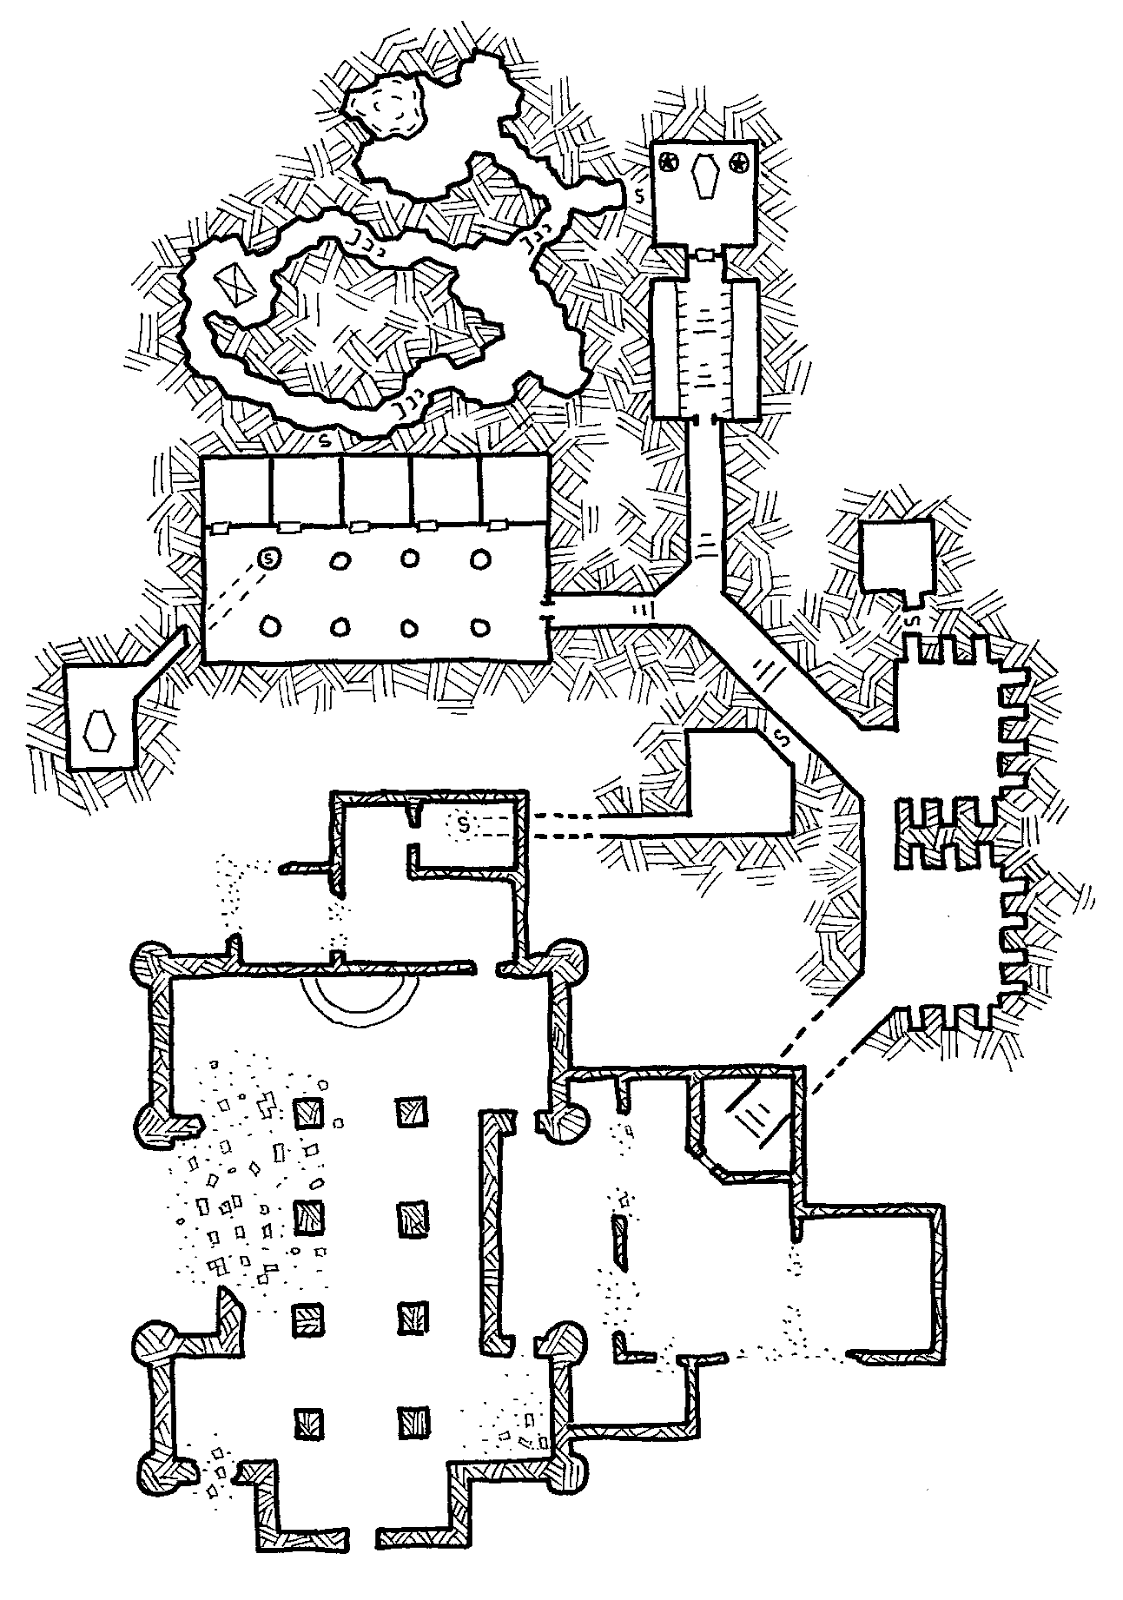
1.  Temple Ruins.  The temple is very dilapidated.  All that remains is crumbling masonry and the offal of creatures who have made this area a lair in the past.  The areas marked 1a are unstable and any prolonged activity (such as searching) by creatures in those areas has a 15% chance/creature to bring masonry tumbling down.  Reflex save DC 13 or 1d6 damage.  The vaulted ceiling above the area marked 1b is filled with webs.  Hidden amongst the webs are 3 Giant Spiders: Init +1, Atk Bite +2 melee (1d4+poison); AC 13; HD 1d8; MV 30', climb 30'; Act 1d20; SP Poison Fort DC 12 or 2d4 Stamina; SV Fort +2, Ref +3, Will -1; AL N.

2.  Vestry.  These chambers are where the former priest of the temple lived and worked.  All is empty now save for an undiscovered secret trapdoor beneath a flagstone.  The hinges and counterweight of the door are surprisingly still in good working condition.  There are metal ladder rungs that lead down into the passage to 4.

3.  Cloister.  The monks and laypersons attached to the temple used to reside here.  One greedy little monk had carved out a small secret closet in the temple buttress.  Inside he hid all his worldly wealth in a locked chest.  The lock is rusted and difficult to pick (DC 15).  If the chest has to be broken the potion inside has a 60% chance of breaking.  Inside the chest are 200 GP worth of assorted coins, an ivory comb set with silver worth 50 GP and a vial with an oil of Cure Paralysis (how convenient!)

The door in the northeast is made of wood, stoutly banded with iron.  It is in considerably better condition than the rest of the temple.  It is also locked (DC 12).

4.  Priests Rumpus Room.  The former priest of the temple was apparently a naught boy.  His secret pleasure room has not been discovered by the other denizens of the crypt and still contains many devices of a deviant nature.  The specifics are left up to the judge to determine, however, if a buyer with the right kind of kink can be found the devices would be worth 400 GP.

5.  Crypt.  There are 10 grave niches lining the walls in this crypt.  Searching will likely (75% chance) draw the guardians from 6.  Loud noises or combat will certainly draw them.  The niches themselves each have a 30% chance to contain some kind of treasure from the following table:
                1 - 36 CP                                              
                2 - Scroll of Light                             
                3 - Silver Dagger                                 
                4 - Platinum Charm (10 GP)             
                5 - Jeweled Brooch (25 GP)
                6 - Emerald Pendant (75 GP)
                7 - Brass Urn (5 GP) 
                8 - 7 GP
                9 - Silver Ring (15 GP)
                10 - Lucky CP (+1 Luck for 3 days)
                11 - Moss Agate (15 GP)
                12 - Bronze Bracers (+1 AC used as shield)

6. Crypt.  Same as 5 above, plus 2 4-Armed Skeletons: Init +2, Atk claw +1 melee (1d3) or by weapon +1 melee; AC 15; HD 2d6; MV 30', Act 1d20+1d16+1d14, SP un-dead, half damage from piercing and slashing weapons; SV Fort +0, Ref +1, Will +0; AL C.  The first skeleton wears chainmail and carries a shield (+1 AC), a scimitar, a hand axe and a dagger.  The second wears chainmail, carries 2 shields (+2 AC), a long sword and a spear.

7.  Secret Crypt.  The back wall of the grave niche in room 6 is false.  If pushed it swings open revealing a crawlspace into room 7.  The crawlspace is trapped with several pressure plates (4 in 6 chance anyone crawling through will hit one) that trigger a falling block trap (Reflex DC 15 because of the confined space or 2d6 damage).  The fallen block will also prevent passage into room 7 until it is removed, a task requiring extreme ingenuity or heavy tools.  The room itself contains the mummified remains of a minor saint of the original religion of the temple.  If the religion is still practiced, pieces of the mummy could be sold as relics for a tidy sum.  In addition there is a golden egg clutched by the mummy.  The egg is about 1.5 feet long by 1 foot wide.  If the egg is ever targeted by magical fire (Fireball, Flaming Hands, a fire trap, etc.) the egg will hatch.  What comes out of the egg is up to the Judge but some ideas are: a miniature replica of the saint retuned to life who believes the characters are his divine saviors, a cockatrice, a celestial butterfly, the vicious Chicken of Bristol.

8.  Magic Mouth.  A carved stone mouth adorns the wall facing southeast approximately 7 feet above the landing.  When any creature other than the Ghouls and their servants steps on the landing it animates and asks the following question in a deep and booming voice; "From whence goes that which comes?".  There is no correct answer to the riddle.  The mouth was placed here by a patron boon cast by Mordech. Mordech asked for a deadly trap of hellfire to guard his lair but he rolled poorly and barely passed his spell check.  His patron, Uzobzesus, sent the magic mouth instead.  The loudly posed question (and the inevitable discussion amongst the party that takes place afterward) will alert the Ghouls in area 9, and they will be ready to spring their trap.

9.  Ghoul Hall.  This long, pillared hall is where the Ghouls congregate.  The floor is littered with the bleached bones of their various victims.  Piles of bones are stacked up around most of the pillars and in the corners.  Observant characters may notice that there are no bones in front of the 5 doors on the north wall.  When anyone moves into the center of the room, or approaches one of the doors, the Ghouls will launch their ambush.  All 5 doors will fly open at once and the monsters will attack.  Below is any changes to the standard Ghoul stat block and the contents of the cell for each Ghoul.
                9a.  Bite effect 6, Bronze Amphora (25 GP), belt-pouch containing 42 SP.
                9b.  3 HD Ghoul, Bite effect 7, Silver Great sword.
                9c.  Bite effect 4, 26 PP, Decorative Buckler (Magic, No AC Bonus, +2 Reflex Save, Improves characters dancing ability)
                9d.  3 HD Ghoul, Bite effect 8.  Wizard's Grimoire containing a magical fire trap (2d7 damage, Reflex DC 14 for half).  Contains one                                 random spell.
                9e.  3 HD Ghoul, Bite effect 5.  Superbly crafted and decorated mahogany chest worth 200 GP.  It has a high quality lock (DC 20).  It
                                is empty.  Worthless if broken open.

The secret door in the northwest-most pillar is very difficult to locate and a character would have to be specifically searching for secret doors on that pillar to even have a chance.  Metal rungs set inside the pillar lead down to the passage to room 10.

10.  Mordech's Chamber.  This is the true chamber of the Master Ghoul.  Room 12 is specifically set up to look like the chamber of the Master, while this room is plain and unadorned, save for the stone sarcophagus in the center.  The lid of the coffin bolts from the inside and would need heavy equipment or powerful magic to lift.  Mordech: Init +2, Atk bite +6 melee (1d4+1+Bite Effect 11 or 12) or scimitar +6 melee (2d5+2) or harmful spell (Spell-check DC 12=2d4 damage, DC 16=3d4 damage, DC 20=Save vs. Fort or Die!); AC 16; HD 6d6 (27 hp); MV 30'; Act 1d20 + 1d16; SP un-dead traits, bite effect, infravision 100'; SV Fort +5, Ref +2, Will +5; AL C.  Mordech's main treasure is kept in room 15.  His scimitar is of very fine quality and causes 2d5 points of damage.  He also wears a magic brooch that protects him from magic missile spells, regardless of the Spell-check DC.  It has 4 charges left.

11.  Shelf Room.  The stairs descend to the north a total of 20' in the center of the room but the shelves on the sides stay at the height of the entrance.  Hiding on the western shelf at the far north end is a Primeval Slime that will drop on any living creature that gets near.  It is ochre of color and has the Protoplasmic Breakdown and Paralyzing Touch properties.

The door at the end of the room is made of heavy bronze.  It has a large lock built into the door and looks well-oiled and sturdy (DC 15 to pick - Magic or heavy equipment to break through).  The door is trapped with a ceiling and floor rack of spears.  The trap has a +8 to hit and does 2d6 damage. 

12.  False Master's Chamber.  This room is designed to appear to be the Master Ghoul's lair.  The walls are hung with expensive tapestries (500 GP) and the statues are adorned with silks (100 GP).  The coffin is decorated and the corners are piled with treasure (500 GP of assorted coins in 3 chests, 5 gems worth 135 GP, a scroll of 2 spells and a finely crafted Battleaxe (+1 to hit, 2d5 damage).  In fact, it is the lair of Mordech's first progeny and lieutenant, Lysandrus.  Lysandrus is a 4 HD Ghoul with Bite Effect 10.

13.  Piercer Chamber.  The walls and ceiling are dug out of the earth here so observant characters may notice that the 5 stalactites in the center of this room are a bit out of place.  They are, in fact, piercers.  They attack with a +10 dealing 2d8 points of damage.  If they miss they begin the slow climb back to the ceiling with their many, tiny feet.  They are easily killed by anyone with a real weapon.

14.  Trapped Passage.  Walking through the center of the widened passage will trigger the 20' pit trap (Reflex DC 14 or 2d6 damage).  As if that isn't bad enough Mordech has placed 2 Skeleton Cobras: Init +2; Atk bite +1 (1d2 + poison); AC 13; HD 1d6; MV 40'; Act 1d20; SP Poison - One Dose only, Fort DC 14 or 2d4 Agility every hour for 3 hours.  Save each hour.; SV Fort +0, Ref +2, Will +0; AL C.

15.  Sending Pool.  Mordech consecrated this pool to Uzobzesus and regularly performs rituals here.  The water is dark and still and reflects as a mirror.  The pool is  bottomless, or rather, the bottom of the pool is actually a portal to the netherworld from which Uzobzesus can send the occasional servant or gift.  The corners of the cavern do contain some clothing and equipment of previous sacrificial victims.  85 GP in assorted coins, 250 GP in various Jewelry and a cloak that radiates slight magic and provides the wearer with Infravision 20'.  If the wearer already possesses Infravision it extends the range by 10'.

If Mordech has been slain there is a 20% chance that Uzobzesus sends a Deep One Shaman: Init +1; Atk claw +3 melee (1d6); AC 15; HD 3d8+6 (23 hp); MV 20' or swim 40'; Act 1d20; SV Fort +4, Ref +1, Will +6; AL C, to demand that one of the party take Mordech's place as his servant.  If the party refuses the Shaman will attempt to curse them (Will Save DC 18 or -4 Luck).  If the curse succeeds Uzobzesus will consider the matter over.  If the party stops the Shaman from delivering the curse they will earn the further enmity of Uzobzesus who will periodically send his servants to harass and damage them.

If someone from the party accepts the deal, have fun creating the patron stats for Uzobzesus!


Sunday, March 23, 2014

Ghoul's Paradise

+Mike Evans post in Google+ about alternate Ghoul effects inspired me to draw this ghoulish lair beneath a crumbling temple.  A VTT-ready .png download link is included below as usual.  I plan on writing a one-page-dungeon for the location in the near future.  Perhaps on the flight to Gary Con VI!


Ghoul's Paradise VTT-ready .PNG

Monday, March 17, 2014

Mad Elf Mine

Decades ago, Dwarven miners (are there any other kind?) accidentally broke into an ancient Temple of Chaos in their relentless pursuit of gold.  Abandoning the mine, the Dwarves spread tales of the horrors that dwell within the Temple.  Those tales spread and drew several bands of adventurers who returned with little to show, or were never heard from again.


And a little DCC flavor and crunch...


One such adventurer, an Elf, remains in the mine, driven mad by the evil within.  The mine is now known as 'Mad Elf Mine'.

Mad Elf: Init +2; Atk longbow +2 missile (1d6), dagger -1 melee (1d4-1), or harmful spell; AC 14; HD 3d6 (13 hp); MV 30’; Act 1d20; SP prestidigitation, harmful spell 3/day; SV Fort +1, Ref +3, Will +4; AL Chaotic.

The Mad Elf has the abilities of prestidigitation and harmful spell as the Magician on p. 433 of the core rulebook.  He will use these, as well as attacking with his longbow from outside the light range, to harass intruders, lead them into danger areas and generally cause havoc.  The Mad Elf is aware of the secret entrances to rooms 7 and 8, but not room 12.  The Elf failed his save against the evil carvings in room 16 and eventually returned to the mine to serve as a Chaos acolyte.  He can sometimes be found there praying and tending to the temple.


1.  Entrance.  The mine entrance is partially boarded up and has several faded wooden signs reading "Mad Elf Mine", "Beware" and "Do not Enter".  Observant characters (Luck DC 14) may notice snapped twigs, scuffed dirt and large piles of dung as tell tale signs of a large predator living in the immediate area.

2.  Main Shaft.  The old main shaft to the lower mine still has an intact metal bucket and chain suspended from the ceiling.  The bucket can hold up to 500 lbs. at one time safely.  For every 50 lbs. more there is a cumulative 10% chance a weak link breaks, sending the bucket and all within 60' to the bottom (3d6 damage as the descent will be slowed somewhat by scraping the sides of the shaft).  The Ogre who lairs in room 4 tosses all of his refuse down the shaft, creating a pile of disgusting rotting filth at the bottom.  Searching the pile is sure to cause some kind of debilitating sickness but a successful Luck check will also turn up a large uncut ruby worth 100 GP.

3.  Ogre's Larder.  The Ogre keeps half eaten and future meals in this room.  Currently the occupants are a half eaten deer carcass suspended from the ceiling and an unconscious Halfling named Seamus.  If rescued, Seamus will promise a reward for safe return but ask to accompany the adventurers if they are descending into the mine.  Seamus is a servant of Chaos and has ventured to the mine to seek out the Temple within.  He will help the party until such time as he can effect a double cross.

4.  Ogre's Lair.  The Ogre (Grimlee) sleeps here.  There is a 25% chance he is sleeping, snoring loudly enough to be heard in room 2.  If so, only very loud noises will wake him.  If he is awake he will hear any normal movement, noise or talking in room 2.  Ogre: Init +2; Atk slam +5 melee (1d6+6) or great mace +5 melee (1d8+6); AC 16; HD 4d8+4; MV 20’; Act 1d20; SP bear hug; SV Fort +4, Ref +2, Will +1; AL C.

5.  Mole Rat Burrow.  This area is infested with Mole Rats.  They are identical to a Rat Swarm (p. 424).  They are led by a Giant Mole Rat with the same stats as a Rat, giant (also p. 424).  The Mad Elf eats traps and eats these creatures for sustenance.

6.  Mine Forever.  The Ghosts(3): (Init +2; Atk special (see below); AC 10; HD 2d12; MV fly 40’; Act 1d20; SP un-dead traits, immune to non-magical weapons, 1d4 special abilities; SV Fort +2, Ref +4, Will +6; AL L.) of Dwarven Miners forever swing their incorporeal picks and hammers in this room.  They will attack any non-Lawful creatures that enter.  Their attacks are at +4 and cause 1d4 ability drain from a random physical stat. Placing precious metals or gems in excess of 300 GP on the floor of the room will put the Ghosts to rest earning 2 XP and +1 Luck to all involved.  The treasure will disappear with the Ghosts.

7.  Mad Elf Treasure Room.  The Mad Elf stores his treasure in a chest on the far wall from the Secret Door.  It is trapped with a poison needle (Fort save or Die) and contains 867 GP worth of assorted coins, an obsidian statue of a mastiff with the word "Brutus" etched on the base.  If the command word is spoken the statue will grow to mastiff size and executed the commands of the owner to the best of its ability for up to 30 minutes per week.  At the end of the 30 minutes, or if the command word is spoken backwards ("Suturb"), the dog will revert to statue form.

8.  Mad Elf's Lair.  The Mad Elf lives here.  There is crude furniture cobbled together from mine support beams, a filthy bed made of large Mole Rat skins and a filthy bowl of even filthier water.  The Secret Doors are both clearly identifiable from the inside of the room.

9.  Well of the Damned.  The Dwarves attempted to sink a second shaft in this room but broke through to a vast cavern below.   Every so often (5% chance per turn) a foul wind sweeps up from the depths, carrying the tortured screams of demons or worse with it.  Anyone hearing the sound must make a Will save DC 14 or be shaken (-2 to all attacks, skill and ability checks including spell checks) for 2d3 hours.

10.  Unstable Chamber.  The northwest corner of this room is not well-supported and thus is unstable.  Observant characters with the appropriate background (Miner, or any Dwarf) may notice the lack of supports in this area.  Anyone doing anything more than moving slowly in this area (including searching) has a 30% chance of bringing dirt and rocks down on their head causing 2d4 points of damage.  Reflex save DC 13 to avoid.

11.  Corner Room the First.  4 skeletons of long-dead Dwarves liter the floor.  They were previous victims of the evil carvings in room 16 that were defeated by a group of adventurers.  Their bones have been picked clean, as adventurers are wont to do.

12.  Gas Safe Room.  This room was constructed as a retreat for the miners in case of massive gas leak.  The trapdoor has become overgrown with lichen and moss and is nearly invisible from below.  The room is stocked with magically potable water and iron rations that are still usable.  There is room for 12 to sleep comfortably and stay fed and hydrated for 2 weeks.

13.  Corner Room the Second.  This is an empty room.  There are minute cracks in the floor that lead to room 16 below.  If adventurers linger in this area for more than 10 minutes, a Baby Shadow from 16 will come to investigate.

14.  Shaken Room.  This room once looked like room 6 on the other side of the mine.  A shift in the earth moved the southern half of the room 10' to the east and 15' down.  The pillars in the southern half have collapsed as well.  A Giant Lizard (Init -3; Atk bite +5 melee (3d4); AC 17; HD 3d8; MV 40’ or climb 20’; Act 1d20; SP camouflage; SV Fort +2, Ref -2, Will -2; AL N.) lives here as well.  It will typically wait in hiding using it's camouflage ability until a lone creature is exposed (perhaps climbing down the cliff face) before attacking.  If it manages to kill or incapacitate a creature it will retreat to the ceiling of the southern part of the room to eat.

15.  Miners Shrine.  The original Dwarven miners used this room as a small shrine to their Pantheon.  It is still filled with a subtle Lawful power.  Chaotic creatures will be physically uncomfortable in this room.  Lawful characters who pray to the Miner Dieties and make a sacrifice of at least 10 GP value will receive a temporary +2 to their Luck score.  It will last for 1d5 hours.

16.  Chaos Temple.  This temple was carved out of the earth by unknown devotees to Chaos and Evil.  The main entrance has long since collapsed.  The Dwarven miners accidentally tunneled into it, causing the mayhem that forced them to abandon the mine.  The walls are decorated with profane carvings, as is the basalt altar at the southeastern end.  Anyone inspecting these carvings in anything other than a casual manner must make a Will save DC 10 or feel the overwhelming compulsion to revere the carvings for 2d7 minutes.  Thereafter they must make a Will save DC 10 everyday or be compelled to return to the Temple as swiftly as possible to pray.  After failing 3 times a final Will check DC 15 must be made.  If this check is made the creature will refuse to leave the mine area and become a servitor of Chaos, going mad but gaining Darkvision and 1d3 to all stats. 

The doors on the east wall are 15' tall and made of thick bronze.  They are sealed with a platinum chain and clay seal.  The chain is intricately carved and obviously very valuable.  It would fetch upwards of 700 GP in a large town.  The clay seal is easily broken.  This, however, will draw the ire of the two Baby Shadows who guard the Temple.  In fact, any defacing, mockery or expression of an opposed faith or belief system will alert the Shadows and cause them to attack. 

Baby Shadow (2): Init +3 (able to always surprise); Atk debilitating touch +6 melee (1 Str); AC 13; HD 2d8 (8 hp); MV fly 40’; Act 1d20; SP stalk prey to guarantee surprise, incorporeal, immune to non-magical weapons, un-dead traits; SV Fort +2, Ref +4, Will +3; AL C.

Once the seal is broken, the bronze doors can be opened with the application of at least 30 points of Strength.

17.  The Great Staircase.  A marble staircase descends down into the depths of a large cavern.  The stairs go on for as long as the DM wants them to but certainly beyond the initial visibility of the party.  Any creature who steps out on the steps will draw the attention of Manbats(4) (Init +4; Atk bite +6 melee (1d6); AC 12; HD 2d8 (9, 8, 8, 7 hp);MV 20’, fly 40’; Act 1d20; SP carry off prey; SV Fort +1, Ref+4, Will +2; AL C.) who will attack in 5 rounds.  They will each attempt to carry off a meal and retreat out into the darkness.

18.  The Underdark, The Abyss, The Lost World, Wonderland or New Jersey....your choice!


Thursday, February 27, 2014

The House of the Falerii

Here is a sister map to The Tomb of the Falerii.  The adventure is written to be a prequel, but could easily be adopted as a sequel or loosely related adventure locale.  


The House of the Falerii

Jackal Monkeys (23 total) live in areas 2, 3, 4, 5 and 10.  They will harass anyone who intrudes on their territory.  Typically they will throw their feces from a distance, only attacking physically if one or two party members get separated from the group.  They can go in and out of the arrow slits at will.  The Jackal Monkeys are fond of shiny objects and some treasure is scattered about their lair areas.  Typically this requires a search through dung piles which have a 20% chance to contain rot grubs (burrow to heart in 2d5 rounds.  Fort Save DC 20 or die.  Can be burned in first 2 rounds causing 1d6 or cut out in first 5 rounds causing 2d6 damage).


Jackal Monkeys: Init +2, Atk bite +2 melee (1d4+1), or thrown excrement +3 missile fire (dmg special); AC 14; HD 1d8; MV 30' or climb 30'; Act 1d20; SP Leap up to full movement; SV Fort +2, Ref +4, Will -1; AL N.

Throw Poo: Jackal Monkeys can (and often do) throw their own feces up to 40' at intruders into their territory.  The ordure does not cause physical damage but anyone hit must make a Fortitude save DC 12 or become nauseous (-1d on all attacks, ability, skill or spell checks) until the offending stool is washed off.  Subsequent poo-missiles have no further effect.

Leap:  The Jackal Monkey can leap using its powerful hind legs up to 30', consuming its entire movement for the round.


Jackal Monkeys are the result of bizarre experimentations by wizards in ages past.  Why any magic user powerful enough to conduct such experiments would choose two of the most annoying animals in the history of mammal-dom to combine is a mystery.  Perhaps the plan was to unleash them as a plague upon a rival nation or they are simply an attempt at a practical joke by a half-mad archmage with too much time on his hands.  Either way, they present a definite annoyance, and potential danger to unprepared adventurers.

1.  Entry.  The powerful bronze doors are still intact, requiring tools or a key to open.  Any creature spending more than a few rounds in this area will draw the attention, and subsequent thrown manure of the Jackal Monkeys.

2.  Tower. Dung Pile: Silver Ring (15 GP), 40 GP in assorted coins.

3.  Fortified Hallway.  There is a hidden 20' pit trap (2d6 damage).  Reflex DC 14 to avoid.  The lid is hinged and on a surprisingly still working spring.  Several Jackal Monkey corpses are in the pit. 

4.  Tower.  The door to 5 has fallen off the hinges due to exposure.  Dung Pile: Gold Necklace (45 GP), Platinum cloak pin with inset ruby (60 GP).

5.  Stable Yard.  The large gate is warped and open.  It could be jury rigged to close again with a little effort.  In addition to the Jackal Monkeys that inhabit the yard, 5 Giant Rats: (Init +4; Atk bite +2 melee (1d4+1 plus disease); AC 13; HD 1d6+2; MV 30’ or climb 20’; Act 1d20; SP disease (DC 7 Fort save or additional 1d6 damage); SV Fort +4, Ref +2, Will -1; AL N.) live in the dark corners of filthy enclosure.  The stairs on the southern wall lead up to the battlements.

6.  Entry Hall.  The pool is dark, stagnant and 2' deep.  Anyone feeling around the bottom with their bare hand has a chance (Luck check) to pull up a random coin.

7.  Secret Stairs.  To anywhere you like!

8.  Child's Play.  A little girl sits alone in this room playing with her dolly.  She is a ghost but seems real.  An observant character may notice that a scarf the child wears conceals a ghastly and fatally deep gash across the throat.  The child will readily talk to adventurers claiming that "Mommy said if I was a good girl and stay weally, weally quiet I could have a sweet.  Did you bring me a sweet?  I tried to be quiet Mommy...I tried to be quiet..."  Anyone giving the child a 'sweet' gets a +2 to any save for 3 days, afterward the child will disappear.  Anyone being a 'meanie' will cause the child to wail a baleful curse causing 1d3 Personality loss.  Willpower DC 14 to resist.

9.  Empty Room.  ...

10.  Observation Room.  Dung Pile: 100 GP in assorted coins.

11.  Chamber.  3 Ghouls (Init +1; Atk bite +3 melee (1d4 plus paralyzation) or claw +1 melee (1d3); AC 12; HD 2d6; MV 30’; Act 1d20; SP un-dead traits, paralyzation, infravision 100’; SV Fort +1, Ref +0, Will +0; AL C.) have gained access to this room via the secret door and made it their lair.  A pile of bones in the western nook contains 80 GP in assorted coins and a fine dagger (+1 to hit and 1d5 damage).

12.  The Baths.  These rooms were once opulent, marble baths.  Water randomly, but steadily, drips from the ceiling throughout the chamber.  The dark pool is now home to a giant water moccasin (Viper, giant: Init +6; Atk bite +8 melee (3d6 + poison DC 12 Fort or 1d4 Stamina); AC 16; HD 4d8; MV 30’; Act 1d20; SV Fort +6, Ref +4, Will +2; AL N.).  The northwest corner was once the privy and there is a concealed hole that the snake will use to retreat to the tunnel at 17 if the situation turns dire.

13.  Steam Room.  The natural fissure in the floor here permits a pleasant steam to periodically vent into the room.  Less pleasant are the two Steam Devils (Init +2; Atk bite +4 melee (1d6+2) or breath weapon - 20' cone of steam, Ref DC 12 or 2d6 damage; AC 12; HD 2d6; MV 40’; Act 1d20; SP immune to damage from fire or heat; SV Fort +1, Ref +2, Will +1; AL L.) that now make this room their home.  If slain they will explode in a burst of steam causing 1d8 damage to all within 5'.

14.  Dining Room.  The statue at end of hall is of toga-clad woman holding an amphora pouring into a basin.  It is dry.  5 command words in ancient common (Intelligence DC 15 or related to decipher) are chiseled into the base.  When spoken a liquid magically pours from the amphora into the basin.  It is enough to fill 1 Waterskin.  The liquid will drain away in 1d3 rounds unless captured in a vessel.  The statue can produce 10 times per day, regardless of the combination of the following: 
                                              1.  Water (potable)
                                              2.  Wine (Excellent quality.  Made from grape that is extinct.  15 GP per wineskin)
                                              3.  Vinegar (1 skin of vinegar will dissolve 10' cube of spider webs in 16 if splashed on them)
                                              4.  Honey Milk (counts as a 'Sweet' for encounter in room 8)
                                              5.  Garum (a foul smelling fish sauce - tastes delicious though!)

15.  Servants Corridor.   This area would provide a safe and quiet place to rest.  There is even a fully stocked kitchen, although all of the foodstuffs have been eaten by vermin long ago.

16.  Temple of the Falerii.  The columns and vaulted ceiling have been inhabited by several generations of Giant Spiders (Init +1; Atk bite +3 melee (1d4 + poison); AC 12; HD 2d8; MV fly 30’; Act 1d20; SP poison (DC 8 Fort save or death); SV Fort +2, Ref +3, Will +1; AL L.).  4 such live here now.  Hidden completely by the vast amount of webs are the many corpses of their past victims.  Two are, or were, humanoid and some of their treasure is still cocooned with them.  One has a scroll of Haste and a Magic Cloak (+2 to all Saves)made of human skin (-2 to all Reaction rolls with Humans).  The other has a golden statue worth 100 GP with glowing green jewels for eyes.  The 'eyes' can be removed and permanently shed an eerie green light in a 20' radius unless covered.  If the webs are burned, only the statue will survive the flames. 

The altar contains a platinum service worth 250 GP for the metal alone but upwards of 1,000 GP if the right collector can be found.  There is also a secret compartment in the right side (isn't there always) that contains a Magic Ring which will grant the wearer the ability to cast Word of Command as per the Cleric spell with a Spell Check of +5, twice per day.  There is no penalty for failure.  The ring also functions as a Ring of the Falerii for the related adventure, The Tomb of the Falerii (http://thecastellanscorner.blogspot.com/2014/01/the-tomb-of-falerii.html).

17.  Sewer.  A fine trickle of water runs from the baths in 12 down the center of this sloping tunnel.  It empties into a river about a half mile to the west.


Monday, February 10, 2014

The Cursed Barrows

I wanted to try out a technique that +Michael Mills is using at Canister and Grape for dressed stone walls.  Here is how I used it to make a map of the ever-ubiquitous barrow mound.

...and for you VTTers:


...and a link to the VTT map with transparent background: The Cursed Barrows .PNG

Sunday, February 9, 2014

Dungeon of Lost Coppers

+Dyson Logos  over at Dyson's Dodecahedron posted a contest to complete his Dungeon of Lost Coppers.  Here is his original image:


Obviously I decided to make a submission, otherwise this would be a short and pointless blog entry!

It is a cool start with lots of potential ways to take the map.  I got my inspiration from the set of 6 completed rooms on the upper left there.  Only a secret tunnel heads further into the dungeon from those rooms.  This screamed "Legitimate Front" to me and got me rolling on a Thieve's Guild or Secret Society theme.

Whoever is the power behind the front put a throne room or control room there to have quick and secret access to the rest of the dungeon.

The statue in a cave surrounded by water gave me two ideas. One that there are really two dungeons that are unaware of each other.  Then I took that a step further and assumed the denizens of dungeon 1 have already broken through to dungeon 2.  There they found some sort of "Magical Archeological Stuff" and decided to add a prison and guard complex and continue digging for more such objects further in the cave complex with slave labor.

So here is my final draft for the contest:


Saturday, February 8, 2014

The Secret Smithy of Rurik Thick-Thewed

This map is an entirely secret or concealed enclave accessible via any cavern system or mountainous area.  I've statted it up as a One-Page-Dungeon in my usual format with DCC RPG as the system.

Included is a .JPEG, Keyed .JPEG and .PNG for VTT users as well as a link to the One-Page-Dungeon in .PDF.

Enjoy!


The Secret Smithy of Rurik Thick-Thewed can be placed within an existing cavern structure or as a quest destination on its own.  Rurik Thick-Thewed was a great weapon and armor-smith.  He had a secret technique that his contemporaries were always trying to steal from him.  To keep his technique a secret he hid it in a remote and inhospitable location, complete with deadly traps and denizens for the unwary intruder.

This is probably appropriate for higher level characters, maybe 4th? 

All doors in the complex are made of heavy brass and locked with high-quality mechanisms.

1.  Natural Bridge.  A Giant Cave Fisher lives under the bridge.  It attacks anything that attempts to cross.  It will take time to eat anything it catches and kills, finishing it's meal in 2d3 turns.  Cave Fisher:  Init +5(75% chance surprise); Atk bite +6 melee (1d6+2) or web +8 missile (40' range); AC 18; HD 3d8; MV 30’ or climb 10’; Act 1d20; SV Fort +4, Ref +1, Will +8; AL N.  STR DC 20 to break free of web.

2.  Secret Entrance.  The secret door to Rurik's Smithy is equipped with the most diabolical and impassable magical wards.  No creature save a demi-god or higher could hope to overcome them.  Unfortunately, Rurik forgot to set the wards the last time he left and all that is left is a normal secret door with a scything blade trap.  Reflex DC 15 or 3d4 Damage.

3.  Concealed Entrance.  50' below the lip of the crevasse is a 5' diameter hole in the western wall.  It leads to the steam tunnel.  It is extremely hard to detect from the top as the crevasse is constantly filled with steam vapor.  Characters who spend several turns observing the crevasse will notice a periodic thickening of the steam and may surmise it must originate from somewhere within the crevasse.

4.  Welcome Hall of Rurik Thick-Thewed.  This room is richly appointed with the remains of sturdy and comfortable furniture and decorative pieces.  A medieval man-cave.  Some art objects that have survived the centuries can be gathered and sold for 200 GP.  There is also a formula for a secret allow that Rurik was working on.  It involves mixing Mithril with Diamond dust to create the perfect metal for making blades.  He never quite got the mixture right...

5.  Hammer Room.  On an altar-like stone table against the north side of the room, flanked by eternal flame torches, lies the smith-hammer of Rurik Thick-Thewed.  It is crafted of the finest metals and imbued with magical power.  It can be used as a Warhammer +1 as well as giving a +5 to any smith-related tasks or checks, including knowledge.  There is a diabolical trap in this room however.  Anyone who is not Rurik, or a descendant or Rurik, that touches the hammer triggers numerous spouts at the top of the room to open and discharge highly flammable oil.  In 15 turns the oil will reach the height of the eternal flame torches and ignite, causing 20d6 damage to any living creature in the room.  There is a switch in a random stone on the west wall 3' high and 4' from the southwest corner that will stop the oil and open drainage holes in the floor.

6.  Oddities Room.  Rurik set aside this room for creations of his that interested him but didn't quite work out like he wanted.  One such is the crossbow-axe.  The crossbow portion only has half the normal range and the trigger guard comes loose on a natural 2 or 3 and the Battleaxe is unwieldy, causing only 1d8 points of damage.  The whole contraption also causes the wielder to only roll a d14 for initiative.  It is a +2 magical weapon in all other respects however.  The GM should come up with one or two other such useful, but flawed, items.


7.  Nearly-Finished Room.  Rurik kept his finished components to weapons and armor in this room.  The lot could be sold for 500 GP to weapon and armor smiths, or used by one to reduce the cost of crafting excellent quality weapons by half.

8.  Rare Materials Storage.  Flawless steel ingots lie in pallets on the floor.  Two chests, seemingly carved of the stone of the cavern itself, sit near the eastern wall.  One contains 5 lbs. of pure mithril and is trapped with poison gas (Death in 2d3 rounds or Fort Save DC 18 for 5d6 damage).  The other has 1,500 GP in rare gems, but also contains a very angry small Earth Elemental that has been trapped here for hundreds of years.  Elemental, Earth: Init +4; Atk slam +8 melee (2d6); AC 18; HD 4d8; MV 30’ or dig 30’; Act 1d20; SP elemental traits; SV Fort +7, Ref +2, Will +5; AL N.

9.  The Long Stairs.  The stairs heading south from the main hallway are made of riveted metal.  When any creature touches the floor on the first landing, the entire length of stairs pivots 45 degrees forming a slick ramp to the bottom.  Creatures who cannot brake their fall take 1d6 damage when they smash into the stone wall at the bottom.  Climbing back up would prove extremely difficult, especially for characters in armor.  Crashing into the wall will reveal the secret door.  This is actually a further trap designed to lure intruders into the deadly Steam Tunnel, for once a living creature passes through the secret door, a steel portcullis will drop behind them.  The portcullis locks into place under the stone floor and is nearly impossible to raise by brute force.  The steel bars are 3 inches thick. 

10.  Forge of Rurik Thick-Thewed.  This is where the magic happened.  Rurik's secret was harnessing the power of fire and water.  The pool to the north contains and endless supply of pure heavy water and the basin to the south living fire.  The two combine underneath the dais to power a living statue that would assist Rurik with his smithing.  It will attack anyone entering the room but can only function off of the dais for 5 rounds or it will run out of steam (literally) and cease to function.  Living statue: Init +6 (surprise); Atk tongs +6 melee(1d8) and hammer +6 melee(1d10), or flame gout +4 missile (3d8); AC 20; HD 5d8; MV 30’; Act 1d30; SP surprises 50% of time; SV Fort +6, Ref 0, Will 0; AL N.  It can only use the flame gout twice before needing to recharge on the dais.  Two flawless diamonds are set in the statues eyes.  Removed they are worth 500 GP each.  The anvil on the dais is coated in mithril and would be worth 1,250 GP if it can be removed.  It weighs 1,000 lbs.

11.  Steam Tunnel.   Once every 20 minutes the excess steam created in Rurik's Forge must vent through this tunnel.  Any creature in the tunnel when it does suffers 8d7 points of damage.  There will be a rumbling 12 rounds before the venting that shakes the entire complex, and another of the same 3 rounds before venting.  It is possible for a Halfling, Elf or unarmored Human or Dwarf to climb into room 10 through the secret door.  This would leave them in an extremely vulnerable position if the Living Statue has not already been dealt with.

Secret Smithy of Rurik Thick-Thewed .PNG

Secret Smithy of Rurik Thick-Thewed OPD .PDF