Monday, December 1, 2014

Ruins of the Undercity (Review?)

Ruins of the Undercity (I got it at Lulu, apparently it is available on Drive Thru RPG as well), has been out for a while but I just picked it up, so it's new to me.


It is a "Random DM-less dungeon generator" which is a pretty accurate description.  I picked it up at Lulu, honestly, because I had a great coupon code and wanted to add a bunch of books so I didn't feel like I was getting totally shafted on shipping.  I figured it would be good to hack a few random tables from.  I didn't think I would really be a fan of doing the random dungeon generator.

Boy, was I wrong!  I read the rules and liked the spin the author put on the random dungeon generator rules from the back of the 1e DMG.  It seemed like it would work so I decided to give it a try.  I rolled up a party of Labyrinth Lord characters and set to.  I explored the entire first level of the generated dungeon, setting off a few traps and losing my Fighter in the process.  I didn't find a single copper but it was a ton of fun.

I found a few shafts down to the third level and am currently exploring that environ.  I just narrowly won a fight with 23 Mites (gremlin like humanoids who are fond of traps) thanks to judicious use of Sleep spells!

I am really enjoying the surprise factor with this mini-game.  I didn't think it would work so smoothly, or that it would be so dangerous but still playable.  I'm not much for reviews, I just don't think people really care what I think, but I dig this product.  I am having fun with it and hopefully someone else will too.  The real reason for the blog post instead of just dropping a shout out in Google Plus is that I've created a spreadsheet for use with the game and thought someone might get some use out of it.

In addition to generating standard characters for your favorite OSR Retro-clone or original B/X, 1e AD&D or what have you, you need to keep an Adventure Log.  It tracks the meta information you need to play.  I couldn't find one online and the scanned copy I made lacked in clarity, so I made my own using Excel.  I also included mini-character sheets and hireling blocks with it so I could run the whole thing from one page.  It looks like this:


I found it pretty useful to keep all this stuff in one place.  I play at my desk so I just use the computer but you could easily print this out and use pencil.  I found it easier and less pieces of paper to track in addition to flipping through the book and the LL core book as well.

Here is a link for download:

Ruins of the Undercity Adventure Log and Tracker

Thursday, November 20, 2014

The Cave of the Unknown


I am running a holiday game using B2 The Keep on the Borderlands.  The Cave of the Unknown has been many things in that module for many people.  For this game my Cave of the Unknown is based around +Dyson Logos recent map of  The Cave of Mushrooms.

I've stocked it using Labyrinth Lord rules but it should be compatible or easily converted to any old-school system or retro-clone.

PDF and VTT ready .PNG are included as usual.

Enjoy!

P.S. Folks playing in my B2 game this season, DON'T LOOK!!


General:  The entire cave complex is wet and humid.  Water drips from most exposed surfaces and there are many puddles on the ground.  Thousands of slugs can be seen feeding on the giant mushrooms.  They range from normal size to over 2' in length.  Some can grow much larger.

Wandering Monsters:
1.  Albino Ape* (1) [5]
2.  Carcass Scavenger* (1d2) [7]
3.  Fly, Giant Carnivorous (1d4)
4.  Mushroom Men* (1d3) [9]
5.  Lizard, Giant Gecko* (1d6) [3]
6.  Locust, Subterranean (1d10)


*There are a limited number of these creatures in The Cave.  If encountered as a wandering monster remove them from their normal lair areas (number in brackets).

1.  Main Entrance.  The opening from the wilderness is large, however, not much light is able to penetrate the cave from outside due to the depression and tree cover nearby.  A warm, humid breeze blows from inside the cave regularly.  It carries a musty, loamy smell.

1a.  Hidden Entrance.  This cave entrance is set low to the ground and is partially obscured by vegetation.  Only a focused search in this area will reveal the ingress.

2.  Piercers.  Deadly Piercers (AC 3, HD 1, hp 4, #AT 1, Dam 1-6, Save F1, ML 10, XP 10) have staked out these areas and will attempt to drop on any warm-blooded creatures that pass below.  Roll 2d4 to determine the number of piercers hiding in the ceiling when the characters pass through.

3.  Gecko Lair.  6 Giant Gecko (AC 5, HD 3+1, hp 13 each, #AT 1, Dam 1-8, Save F2, ML 7, XP 100) make their lair here.  They subsist primarily on the Subterranean Locusts that roam the cave.  If the characters disturb a flock of the Locusts anywhere in the cave there is a 50% chance that 1d6 of the Gecko will come to investigate.

The door in the northeast is made of heavy wood, banded with iron, that has somehow not decayed in the many years that it has been here.  The magical runes carved into the iron may have something to do with that.  The door can only be opened by means of a knock spell or other similar magic.  Inside the room is a small table with various alchemical apparatus covered in cobwebs.  They could be sold for 400 GP.  Painted on the floor is a circle of arcane power.  Any magic-user who sleeps fully within the circle for an entire night may memorize the spell locate object for the following day, in addition to his normal allotment of spells, whether he normally knows the spell or not.  If the magic-user is of insufficient level to cast locate object he is still aware that if he could cast that level spell he would be able to after sleeping within this circle.

4.  Forgotten Entrance.  The ledge and steps in this room are not natural formations and have obviously been worked by some creatures.  The passage to the northeast eventually leads to the Boulder Filled Passage at area 51 of The Caves of Chaos.

5.  Albino Ape Lair.  A large Albino Ape (AC 5, HD 5, hp 27, #AT 2 (claw, claw), Dam 1d4+1/1d4+1, Save F3, ML 7, XP 120)  lairs high up on this platform.  He has a penchant for shiny things and has collected a pile of such.  There are 600 GP in loose, assorted coins, a mithril chain shirt +1, and a brass door-knocker with the word Welcome in Bugbear etched into it.

6.  Feeding Flies.  6 Giant Carnivorous Flies (AC 6, HD 2, hp 7 each, #AT 1, Dam 1-6, Save F1, ML 8, XP 29) are feeding on the corpse of a particularly large slug.  They prefer live meat...

7.  Carcass Scavengers.  2 Carcass Scavengers (AC 7, HD 3+1, hp 20 each, #AT 8 (stingers), Dam Paralysis, Save F2, ML 9, XP 135) lair here when they are not out scavenging for carcasses.  1,000 SP inexplicable litter the floor in this area.

8.  Murky Pond.  The waters of this pond are still and dark.  A Giant Crayfish (AC 4, HD 4+4, hp 28, #AT 2 (claws), Dam 2d6/2d6, Save F4, ML 9, XP 140) is often lurking just under the surface, waiting to dart out (surprise 1-3 on d6) and grab a meal.  The pond empties into a larger body of water on a lower level via many twisting and turning water-filled tunnels where only a Giant Crayfish can go.

On a ledge about 4' under the surface of the water lies a helmet of the cunning linguist that belonged to a former snack of the Giant Crayfish.  The helmet is rust free and detects as magical.  It will grant its wearer the ability to speak and understand 3 random languages per day.  The languages are re-rolled each morning.  If the wearer already speaks a randomly determined language he gains the ability to use that language telepathically with any creature who also speaks that language to a range of 100'.

8a.  Sinkhole.  This dark hole in a niche in the cave wall descends further into the depths.  A hot, fetid wind blows sporadically from below. 

9.  Guard Post.  4 Mushroom Men (AC 8, HD 2, hp 10, #AT 2 (fist, spores), Dam 1d4, Save F2, ML 7, XP 35) stand guard on this platform.  If a Mushroom Man hits successfully with a fist attack, the target must make a Save vs. Paralysis or take a -1 to-hit and damage for 1d6 rounds due to a cloud of choking spores that billow forth.  The penalties are not cumulative from multiple strikes but the total rounds affected are.

9a.  Alarm!  A Shrieker (AC 7, HD 3, #AT shriek, Dam shriek, Save F1, ML 12, XP 65) that resembles the rest of the mushrooms in the cavern is planted next to this door.  It will sound its alarm if anyone other than The Mildew Mage [11]or a Mushroom Man approaches within 20' of the door.  The alarm is so loud there is a 50% chance that any aggressive monster left alive in The Cave of the Unknown will be drawn to the plateau.

10.  Mushroom Man Lair.  8 Mushroom Men (see 9 above) live here.  They will move to reinforce areas 9 or 11 in 1d4 rounds if sounds of combat are heard.

10a.  The Mushroom Circle.  The Mushroom Men in The Cave of the Unknown are actually one large fungal growth and this room is where the nerve stem lives.  It is denoted by a ring of small, neon-swirling mushrooms.  If this ring is completely destroyed by fire (10 points of damage) all of the remaining Mushroom Men in the cave will die.  The Mushroom Men make regular offerings of any pretty stones that they find to their fungal mother.  6 gems worth 500, 150, 60, 50, 20 and 5 GP respectively are lying in the middle of the circle.

11.  The Mildew Mage.  Long ago a half-mad wizard (AC 9, HD 4, hp 13, #AT 1 or spell, Dam 1-4, Save MU 4, ML 11, XP 300) entered The Cave of the Unknown.  He reacted to the strange energies of the area and began to grow toadstools out of his ears and neck.  He flourished amid the fungus and finished the journey to full-mad.  He holds court over his mushroom subjects from this room.  He has the following spells prepares; sleep, charm person, detect invisible and levitate. 

4 Mushroom Men (see 9 above) are always in this room and act as bodyguards for the wizard.  If things go badly, the Mildew Mage will use his levitate spell to reach the ledge in the northeast corner 30' above the cavern floor.  A passage there winds back to the surface and emerges under the roots of a massive tree. 

11a.  Sleeping Chamber.  The Mildew Mage accumulated some very nice furniture over the years.  Most of it is thick with various fungal growths, however.  There is a silver platter worth 200 GP that is salvageable, as well as a pair of gold candlesticks worth 350 GP.  A teak chests that is locked holds the spellbook of the wizard as well as a sack with 100 PP and a ruby necklace worth 500 GP.

11b.  Privy.  Mushroom Men may not have to use the facilities but the Mildew Mage does.  Here is where he does it.  Anyone foolish enough to root around in the filth of this room has a 65% chance to be attacked by Rot Grubs (AC 9, HD 1 hit point, #AT special, Dam special, Save 0 level human, ML N/A, XP 5).  


Tuesday, July 29, 2014

Simple Hex Stocking Table

+Chris Mata is starting a new campaign that I am participating in and it has given me ideas to eventually run a Labyrinth Lord hex crawl game of my own.

I started thinking on how I would want to run the game, what multitude of house rules I would create, change or edit.  I pondered the elegant backstory I would craft and convoluted plots I would have to write, endless tables within tables and complicated movement schemes.  That thinking got me to nearly decide not to go forward with the idea.  I instead decided to check out if the core rulebook had anything in there and came upon the Labyrinth stocking table on page 124.  With a design goal to keep the hex crawl simple, and to adhere to the RAW as closely as possible, I decided to use those suggestions as the basis of my rules.

I took a look at the table and thought it would all fit nicely into a wilderness table with a few tweaks.  The 'Empty' and 'Monster' results are self explanatory so those remain unchanged.  I will use the monster tables as they are written in the LL rulebook with a flat percentage that those monsters are encountered in their lair if appropriate.  The 'Trap' result had me thinking for a bit but I finally settle that traps in the wilderness will become environment hazards of a non-monster induced variety.  The bulk of the work was writing up these hazards and creating the terrain appropriate tables.

A result of 'Unique' will mean that the hex contains a mini-dungeon, of which I have a near endless supply thanks to OSR resources such as the One Page Dungeon ContestDyson's DelvesIron Tavern Press Pocket-Sized Encounters, as well as pieces of old TSR modules and my own creations.

I used Hexographer to randomly create a map with a few set parameters.  I converted the miles-per-day overland movement rates presented in the LL rulebook to movement points and assigned a MP value to each type of terrain to make travelling through various hexes with different terrain easier to calculate.  That also provides a nice mechanic for the hazards to work against without having to do a lot of math at the table.  Not all obstacles are deadly, some just slow you down...

That's the basics.  I think the campaign could be ready to go right now.  I've got some other priorities this summer, namely getting The Treasure Vaults of Zadabad playtested and ready for sale!

This was all written with Labyrinth Lord in mind but should be usable with B/X, BECMI, 1e, 2e or any of their clones with little to no reworking.  The work I have so far can be downloaded in word here:

Hex Stocking Tables

Saturday, May 31, 2014

Mutant Future Expanded Wilderness Rules

I've taken a break from the mapping and DCC adventure locales because I started running a Mutant Future campaign.  I got inspired to run this after playing in +Jim Wampler 's very cool playtest of Mutant Crawl Classics at GaryCon.  Since those rules aren't out yet I looked for alternative.  I was about to just run old Gamma World Second Edition but one of the players in my regular Labyrinth Lord game turned me on to Mutant Future.

The rules are great as written.  Very old school feel with lots of room for the GM, or Mutant Lord, as it is called in MF, to tinker.  The campaign idea I had in mind was going to be very heavy on the hex crawl and wilderness exploration themes so the first area I decided to tinker in was with the Wilderness Exploration rules and random encounter charts.

The fun of a hex crawl for me as a GM comes in creating an environment where I am just as surprised by what happens as the players are.  I created the following Wilderness Travel Sequence to help keep us all on our toes.
Of course I made some custom random encounter tables as well.  I haven't tweaked these to exactly where I want them yet, but I did add some bell curve to the types of critters commonly encountered, mostly segmented by power level for now, and the chance for special encounters as well as two or more groups encountered at the same time.


The roll twice are the best!  I love it when they come up.  It forces me to think on my feet and almost always lead to cool roleplaying or push the characters into an unexpected direction.  I rolled Pigmen and Spidergoats!  What exactly is going on here.  Of course they could be fighting each other, that's easy.  The Spidergoats could be tamed by the Pigmen, that would toughen up the encounter a bit.  Better yet, the Pigmen, having previously found the Spidergoat lair are laying in ambush for the Spidergoats to weaken or capture the party and then attack.  Or, since this is Mutant Future, the bizarre; The Spidergoats have a mental mutation that allows them to dominate creatures and the Pigmen are their servants.  Or the really bizarre; one or both groups have a physical mutation that allows them to inter-breed and the party really encounters a fledgling Pig-SpiderGoat army bent on world domination!

Then I created a subtable of 'Special' Encounters.  These are drop-in locales I have created, weird non-combat type encounters, or stuff I have ripped from other sources like +Tim Snider 's awesome One Year in the Savage Afterworld.

You can follow the results of my science project at our campaign website; Mutant Future - Big Sky

All of the charts are here in .doc format for you to enjoy!

Mutant Future Wilderness Travel Sequence

Mutant Future Wandering Encounter Tables

Big Sky Special Encounters

Thursday, April 3, 2014

Livin' in a Ghoul's Paradise

My plan to write this 2-Page Dungeon at Gary Con was definitely too optimistic.  Zero downtime there with all of the great gaming and great gamers to meet.  I've finally gotten around to it though.  Inspired by +Mike Evans 's post on alternate Ghoul Effects, the stats for the denizens of Ghoul's Paradise are for the DCC RPG, but should not be very hard to convert on the fly to any old school system or retro-clone.  I hope you enjoy!

Ghoul's Paradise 2 Page Dungeon .PDF


A powerful Ghoul Master named Mordech has set up a lair for himself and his followers/progeny in the catacombs beneath an abandoned temple.  The Master is also a devotee of a powerful, but fickle, demon-lord named Uzobzesus, who grants the Master powers and may also demand retribution or recompense from anyone who destroys his servant.

Below is a table to generate unique effects of Ghoul bit attacks.  The Judge should feel free to roll randomly for each Ghoul encountered or created during the adventure.  Suggestions for the ghouls that are currently part of the pack are listed in the room entries.


Alternate Ghoul Bite Effects Table (Roll 1d6+Ghould HD)

3.  Target believes he or she has been turned undead.  Will save DC 14 each day to shake off the effect.
4.  Will save DC 14 every round or target loses all actions due to uncontrollable vomiting of black oily mucous.
5.  Target's hair turns white permanently.
6.  Random limb is paralyzed for 1d6 hours.
7.  Bite causes  a wound that becomes infected with writhing maggots (-2 Agility).  The maggots mature in 2d2 days causing 2d7 points of damage per day as they eat the host from within.  Magical healing will kill the maggots.
8.Normal Paralysis Effect.
9.  Normal Paralysis Effect and Target ages 3d5 years.
10.  Target's skin erupts in painful hives (-4 Agility, -2 Stamina) until magically healed.  After healing Fort save DC 14 or Stamina damage is permanent.
11.  Target's flesh begins to putrefy and slough off causing 2d6 damage immediately and a cumulative 1d6 damage per day until magically healed (e.g. day 2 - 3d6 damage, day 3 - 4d6, etc.).

12.  Normal Paralysis and the target's skin dries out and pulls tight in an imitation of death (-2d3 Personality and -1d2 Agility permanently).

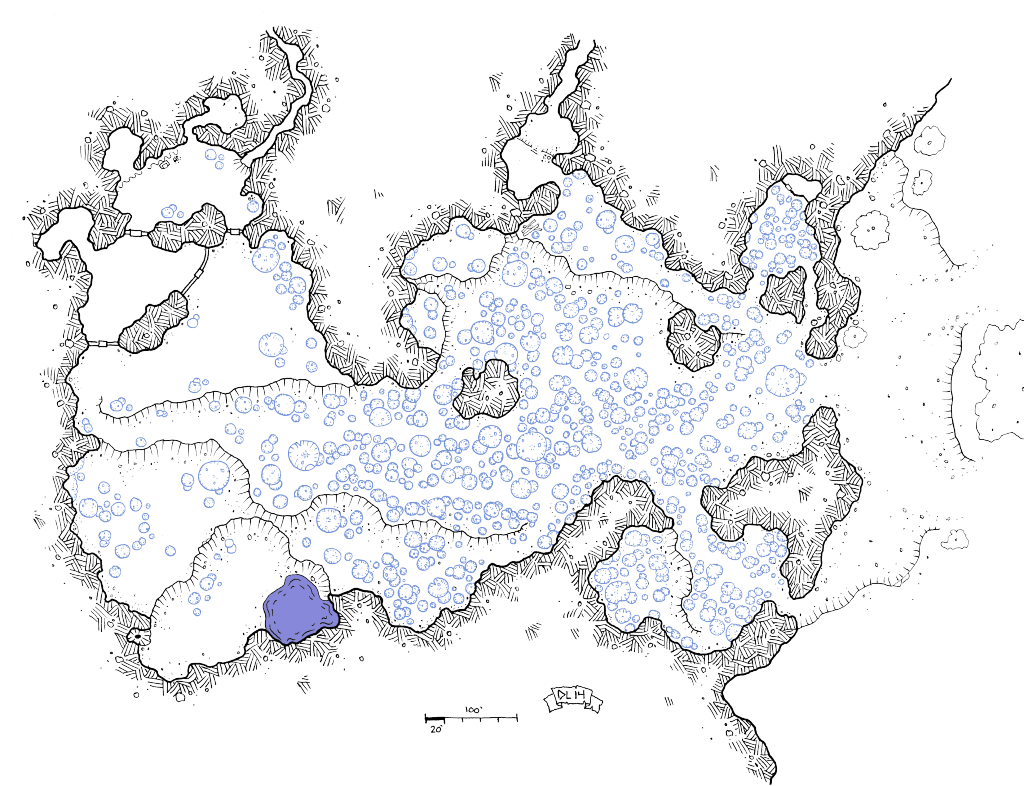
1.  Temple Ruins.  The temple is very dilapidated.  All that remains is crumbling masonry and the offal of creatures who have made this area a lair in the past.  The areas marked 1a are unstable and any prolonged activity (such as searching) by creatures in those areas has a 15% chance/creature to bring masonry tumbling down.  Reflex save DC 13 or 1d6 damage.  The vaulted ceiling above the area marked 1b is filled with webs.  Hidden amongst the webs are 3 Giant Spiders: Init +1, Atk Bite +2 melee (1d4+poison); AC 13; HD 1d8; MV 30', climb 30'; Act 1d20; SP Poison Fort DC 12 or 2d4 Stamina; SV Fort +2, Ref +3, Will -1; AL N.

2.  Vestry.  These chambers are where the former priest of the temple lived and worked.  All is empty now save for an undiscovered secret trapdoor beneath a flagstone.  The hinges and counterweight of the door are surprisingly still in good working condition.  There are metal ladder rungs that lead down into the passage to 4.

3.  Cloister.  The monks and laypersons attached to the temple used to reside here.  One greedy little monk had carved out a small secret closet in the temple buttress.  Inside he hid all his worldly wealth in a locked chest.  The lock is rusted and difficult to pick (DC 15).  If the chest has to be broken the potion inside has a 60% chance of breaking.  Inside the chest are 200 GP worth of assorted coins, an ivory comb set with silver worth 50 GP and a vial with an oil of Cure Paralysis (how convenient!)

The door in the northeast is made of wood, stoutly banded with iron.  It is in considerably better condition than the rest of the temple.  It is also locked (DC 12).

4.  Priests Rumpus Room.  The former priest of the temple was apparently a naught boy.  His secret pleasure room has not been discovered by the other denizens of the crypt and still contains many devices of a deviant nature.  The specifics are left up to the judge to determine, however, if a buyer with the right kind of kink can be found the devices would be worth 400 GP.

5.  Crypt.  There are 10 grave niches lining the walls in this crypt.  Searching will likely (75% chance) draw the guardians from 6.  Loud noises or combat will certainly draw them.  The niches themselves each have a 30% chance to contain some kind of treasure from the following table:
                1 - 36 CP                                              
                2 - Scroll of Light                             
                3 - Silver Dagger                                 
                4 - Platinum Charm (10 GP)             
                - Jeweled Brooch (25 GP)
                6 - Emerald Pendant (75 GP)
                7 - Brass Urn (5 GP) 
                8 - 7 GP
                9 - Silver Ring (15 GP)
                10 - Lucky CP (+1 Luck for 3 days)
                11 - Moss Agate (15 GP)
                12 - Bronze Bracers (+1 AC used as shield)

6. Crypt.  Same as 5 above, plus 2 4-Armed Skeletons: Init +2, Atk claw +1 melee (1d3) or by weapon +1 melee; AC 15; HD 2d6; MV 30', Act 1d20+1d16+1d14, SP un-dead, half damage from piercing and slashing weapons; SV Fort +0, Ref +1, Will +0; AL C.  The first skeleton wears chainmail and carries a shield (+1 AC), a scimitar, a hand axe and a dagger.  The second wears chainmail, carries 2 shields (+2 AC), a long sword and a spear.

7.  Secret Crypt.  The back wall of the grave niche in room 6 is false.  If pushed it swings open revealing a crawlspace into room 7.  The crawlspace is trapped with several pressure plates (4 in 6 chance anyone crawling through will hit one) that trigger a falling block trap (Reflex DC 15 because of the confined space or 2d6 damage).  The fallen block will also prevent passage into room 7 until it is removed, a task requiring extreme ingenuity or heavy tools.  The room itself contains the mummified remains of a minor saint of the original religion of the temple.  If the religion is still practiced, pieces of the mummy could be sold as relics for a tidy sum.  In addition there is a golden egg clutched by the mummy.  The egg is about 1.5 feet long by 1 foot wide.  If the egg is ever targeted by magical fire (Fireball, Flaming Hands, a fire trap, etc.) the egg will hatch.  What comes out of the egg is up to the Judge but some ideas are: a miniature replica of the saint retuned to life who believes the characters are his divine saviors, a cockatrice, a celestial butterfly, the vicious Chicken of Bristol.

8.  Magic Mouth.  A carved stone mouth adorns the wall facing southeast approximately 7 feet above the landing.  When any creature other than the Ghouls and their servants steps on the landing it animates and asks the following question in a deep and booming voice; "From whence goes that which comes?".  There is no correct answer to the riddle.  The mouth was placed here by a patron boon cast by Mordech. Mordech asked for a deadly trap of hellfire to guard his lair but he rolled poorly and barely passed his spell check.  His patron, Uzobzesus, sent the magic mouth instead.  The loudly posed question (and the inevitable discussion amongst the party that takes place afterward) will alert the Ghouls in area 9, and they will be ready to spring their trap.

9.  Ghoul Hall.  This long, pillared hall is where the Ghouls congregate.  The floor is littered with the bleached bones of their various victims.  Piles of bones are stacked up around most of the pillars and in the corners.  Observant characters may notice that there are no bones in front of the 5 doors on the north wall.  When anyone moves into the center of the room, or approaches one of the doors, the Ghouls will launch their ambush.  All 5 doors will fly open at once and the monsters will attack.  Below is any changes to the standard Ghoul stat block and the contents of the cell for each Ghoul.
                9a.  Bite effect 6, Bronze Amphora (25 GP), belt-pouch containing 42 SP.
                9b.  3 HD Ghoul, Bite effect 7, Silver Great sword.
                9c.  Bite effect 4, 26 PP, Decorative Buckler (Magic, No AC Bonus, +2 Reflex Save, Improves characters dancing ability)
                9d.  3 HD Ghoul, Bite effect 8.  Wizard's Grimoire containing a magical fire trap (2d7 damage, Reflex DC 14 for half).  Contains one                                 random spell.
                9e.  3 HD Ghoul, Bite effect 5.  Superbly crafted and decorated mahogany chest worth 200 GP.  It has a high quality lock (DC 20).  It
                                is empty.  Worthless if broken open.

The secret door in the northwest-most pillar is very difficult to locate and a character would have to be specifically searching for secret doors on that pillar to even have a chance.  Metal rungs set inside the pillar lead down to the passage to room 10.

10.  Mordech's Chamber.  This is the true chamber of the Master Ghoul.  Room 12 is specifically set up to look like the chamber of the Master, while this room is plain and unadorned, save for the stone sarcophagus in the center.  The lid of the coffin bolts from the inside and would need heavy equipment or powerful magic to lift.  Mordech: Init +2, Atk bite +6 melee (1d4+1+Bite Effect 11 or 12) or scimitar +6 melee (2d5+2) or harmful spell (Spell-check DC 12=2d4 damage, DC 16=3d4 damage, DC 20=Save vs. Fort or Die!); AC 16; HD 6d6 (27 hp); MV 30'; Act 1d20 + 1d16; SP un-dead traits, bite effect, infravision 100'; SV Fort +5, Ref +2, Will +5; AL C.  Mordech's main treasure is kept in room 15.  His scimitar is of very fine quality and causes 2d5 points of damage.  He also wears a magic brooch that protects him from magic missile spells, regardless of the Spell-check DC.  It has 4 charges left.

11.  Shelf Room.  The stairs descend to the north a total of 20' in the center of the room but the shelves on the sides stay at the height of the entrance.  Hiding on the western shelf at the far north end is a Primeval Slime that will drop on any living creature that gets near.  It is ochre of color and has the Protoplasmic Breakdown and Paralyzing Touch properties.

The door at the end of the room is made of heavy bronze.  It has a large lock built into the door and looks well-oiled and sturdy (DC 15 to pick - Magic or heavy equipment to break through).  The door is trapped with a ceiling and floor rack of spears.  The trap has a +8 to hit and does 2d6 damage. 

12.  False Master's Chamber.  This room is designed to appear to be the Master Ghoul's lair.  The walls are hung with expensive tapestries (500 GP) and the statues are adorned with silks (100 GP).  The coffin is decorated and the corners are piled with treasure (500 GP of assorted coins in 3 chests, 5 gems worth 135 GP, a scroll of 2 spells and a finely crafted Battleaxe (+1 to hit, 2d5 damage).  In fact, it is the lair of Mordech's first progeny and lieutenant, Lysandrus.  Lysandrus is a 4 HD Ghoul with Bite Effect 10.

13.  Piercer Chamber.  The walls and ceiling are dug out of the earth here so observant characters may notice that the 5 stalactites in the center of this room are a bit out of place.  They are, in fact, piercers.  They attack with a +10 dealing 2d8 points of damage.  If they miss they begin the slow climb back to the ceiling with their many, tiny feet.  They are easily killed by anyone with a real weapon.

14.  Trapped Passage.  Walking through the center of the widened passage will trigger the 20' pit trap (Reflex DC 14 or 2d6 damage).  As if that isn't bad enough Mordech has placed 2 Skeleton Cobras: Init +2; Atk bite +1 (1d2 + poison); AC 13; HD 1d6; MV 40'; Act 1d20; SP Poison - One Dose only, Fort DC 14 or 2d4 Agility every hour for 3 hours.  Save each hour.; SV Fort +0, Ref +2, Will +0; AL C.

15.  Sending Pool.  Mordech consecrated this pool to Uzobzesus and regularly performs rituals here.  The water is dark and still and reflects as a mirror.  The pool is  bottomless, or rather, the bottom of the pool is actually a portal to the netherworld from which Uzobzesus can send the occasional servant or gift.  The corners of the cavern do contain some clothing and equipment of previous sacrificial victims.  85 GP in assorted coins, 250 GP in various Jewelry and a cloak that radiates slight magic and provides the wearer with Infravision 20'.  If the wearer already possesses Infravision it extends the range by 10'.

If Mordech has been slain there is a 20% chance that Uzobzesus sends a Deep One Shaman: Init +1; Atk claw +3 melee (1d6); AC 15; HD 3d8+6 (23 hp); MV 20' or swim 40'; Act 1d20; SV Fort +4, Ref +1, Will +6; AL C, to demand that one of the party take Mordech's place as his servant.  If the party refuses the Shaman will attempt to curse them (Will Save DC 18 or -4 Luck).  If the curse succeeds Uzobzesus will consider the matter over.  If the party stops the Shaman from delivering the curse they will earn the further enmity of Uzobzesus who will periodically send his servants to harass and damage them.

If someone from the party accepts the deal, have fun creating the patron stats for Uzobzesus!


Sunday, March 23, 2014

Ghoul's Paradise

+Mike Evans post in Google+ about alternate Ghoul effects inspired me to draw this ghoulish lair beneath a crumbling temple.  A VTT-ready .png download link is included below as usual.  I plan on writing a one-page-dungeon for the location in the near future.  Perhaps on the flight to Gary Con VI!


Ghoul's Paradise VTT-ready .PNG

Monday, March 17, 2014

Mad Elf Mine

Decades ago, Dwarven miners (are there any other kind?) accidentally broke into an ancient Temple of Chaos in their relentless pursuit of gold.  Abandoning the mine, the Dwarves spread tales of the horrors that dwell within the Temple.  Those tales spread and drew several bands of adventurers who returned with little to show, or were never heard from again.


And a little DCC flavor and crunch...


One such adventurer, an Elf, remains in the mine, driven mad by the evil within.  The mine is now known as 'Mad Elf Mine'.

Mad Elf: Init +2; Atk longbow +2 missile (1d6), dagger -1 melee (1d4-1), or harmful spell; AC 14; HD 3d6 (13 hp); MV 30’; Act 1d20; SP prestidigitation, harmful spell 3/day; SV Fort +1, Ref +3, Will +4; AL Chaotic.

The Mad Elf has the abilities of prestidigitation and harmful spell as the Magician on p. 433 of the core rulebook.  He will use these, as well as attacking with his longbow from outside the light range, to harass intruders, lead them into danger areas and generally cause havoc.  The Mad Elf is aware of the secret entrances to rooms 7 and 8, but not room 12.  The Elf failed his save against the evil carvings in room 16 and eventually returned to the mine to serve as a Chaos acolyte.  He can sometimes be found there praying and tending to the temple.


1.  Entrance.  The mine entrance is partially boarded up and has several faded wooden signs reading "Mad Elf Mine", "Beware" and "Do not Enter".  Observant characters (Luck DC 14) may notice snapped twigs, scuffed dirt and large piles of dung as tell tale signs of a large predator living in the immediate area.

2.  Main Shaft.  The old main shaft to the lower mine still has an intact metal bucket and chain suspended from the ceiling.  The bucket can hold up to 500 lbs. at one time safely.  For every 50 lbs. more there is a cumulative 10% chance a weak link breaks, sending the bucket and all within 60' to the bottom (3d6 damage as the descent will be slowed somewhat by scraping the sides of the shaft).  The Ogre who lairs in room 4 tosses all of his refuse down the shaft, creating a pile of disgusting rotting filth at the bottom.  Searching the pile is sure to cause some kind of debilitating sickness but a successful Luck check will also turn up a large uncut ruby worth 100 GP.

3.  Ogre's Larder.  The Ogre keeps half eaten and future meals in this room.  Currently the occupants are a half eaten deer carcass suspended from the ceiling and an unconscious Halfling named Seamus.  If rescued, Seamus will promise a reward for safe return but ask to accompany the adventurers if they are descending into the mine.  Seamus is a servant of Chaos and has ventured to the mine to seek out the Temple within.  He will help the party until such time as he can effect a double cross.

4.  Ogre's Lair.  The Ogre (Grimlee) sleeps here.  There is a 25% chance he is sleeping, snoring loudly enough to be heard in room 2.  If so, only very loud noises will wake him.  If he is awake he will hear any normal movement, noise or talking in room 2.  Ogre: Init +2; Atk slam +5 melee (1d6+6) or great mace +5 melee (1d8+6); AC 16; HD 4d8+4; MV 20’; Act 1d20; SP bear hug; SV Fort +4, Ref +2, Will +1; AL C.

5.  Mole Rat Burrow.  This area is infested with Mole Rats.  They are identical to a Rat Swarm (p. 424).  They are led by a Giant Mole Rat with the same stats as a Rat, giant (also p. 424).  The Mad Elf eats traps and eats these creatures for sustenance.

6.  Mine Forever.  The Ghosts(3): (Init +2; Atk special (see below); AC 10; HD 2d12; MV fly 40’; Act 1d20; SP un-dead traits, immune to non-magical weapons, 1d4 special abilities; SV Fort +2, Ref +4, Will +6; AL L.) of Dwarven Miners forever swing their incorporeal picks and hammers in this room.  They will attack any non-Lawful creatures that enter.  Their attacks are at +4 and cause 1d4 ability drain from a random physical stat. Placing precious metals or gems in excess of 300 GP on the floor of the room will put the Ghosts to rest earning 2 XP and +1 Luck to all involved.  The treasure will disappear with the Ghosts.

7.  Mad Elf Treasure Room.  The Mad Elf stores his treasure in a chest on the far wall from the Secret Door.  It is trapped with a poison needle (Fort save or Die) and contains 867 GP worth of assorted coins, an obsidian statue of a mastiff with the word "Brutus" etched on the base.  If the command word is spoken the statue will grow to mastiff size and executed the commands of the owner to the best of its ability for up to 30 minutes per week.  At the end of the 30 minutes, or if the command word is spoken backwards ("Suturb"), the dog will revert to statue form.

8.  Mad Elf's Lair.  The Mad Elf lives here.  There is crude furniture cobbled together from mine support beams, a filthy bed made of large Mole Rat skins and a filthy bowl of even filthier water.  The Secret Doors are both clearly identifiable from the inside of the room.

9.  Well of the Damned.  The Dwarves attempted to sink a second shaft in this room but broke through to a vast cavern below.   Every so often (5% chance per turn) a foul wind sweeps up from the depths, carrying the tortured screams of demons or worse with it.  Anyone hearing the sound must make a Will save DC 14 or be shaken (-2 to all attacks, skill and ability checks including spell checks) for 2d3 hours.

10.  Unstable Chamber.  The northwest corner of this room is not well-supported and thus is unstable.  Observant characters with the appropriate background (Miner, or any Dwarf) may notice the lack of supports in this area.  Anyone doing anything more than moving slowly in this area (including searching) has a 30% chance of bringing dirt and rocks down on their head causing 2d4 points of damage.  Reflex save DC 13 to avoid.

11.  Corner Room the First.  4 skeletons of long-dead Dwarves liter the floor.  They were previous victims of the evil carvings in room 16 that were defeated by a group of adventurers.  Their bones have been picked clean, as adventurers are wont to do.

12.  Gas Safe Room.  This room was constructed as a retreat for the miners in case of massive gas leak.  The trapdoor has become overgrown with lichen and moss and is nearly invisible from below.  The room is stocked with magically potable water and iron rations that are still usable.  There is room for 12 to sleep comfortably and stay fed and hydrated for 2 weeks.

13.  Corner Room the Second.  This is an empty room.  There are minute cracks in the floor that lead to room 16 below.  If adventurers linger in this area for more than 10 minutes, a Baby Shadow from 16 will come to investigate.

14.  Shaken Room.  This room once looked like room 6 on the other side of the mine.  A shift in the earth moved the southern half of the room 10' to the east and 15' down.  The pillars in the southern half have collapsed as well.  A Giant Lizard (Init -3; Atk bite +5 melee (3d4); AC 17; HD 3d8; MV 40’ or climb 20’; Act 1d20; SP camouflage; SV Fort +2, Ref -2, Will -2; AL N.) lives here as well.  It will typically wait in hiding using it's camouflage ability until a lone creature is exposed (perhaps climbing down the cliff face) before attacking.  If it manages to kill or incapacitate a creature it will retreat to the ceiling of the southern part of the room to eat.

15.  Miners Shrine.  The original Dwarven miners used this room as a small shrine to their Pantheon.  It is still filled with a subtle Lawful power.  Chaotic creatures will be physically uncomfortable in this room.  Lawful characters who pray to the Miner Dieties and make a sacrifice of at least 10 GP value will receive a temporary +2 to their Luck score.  It will last for 1d5 hours.

16.  Chaos Temple.  This temple was carved out of the earth by unknown devotees to Chaos and Evil.  The main entrance has long since collapsed.  The Dwarven miners accidentally tunneled into it, causing the mayhem that forced them to abandon the mine.  The walls are decorated with profane carvings, as is the basalt altar at the southeastern end.  Anyone inspecting these carvings in anything other than a casual manner must make a Will save DC 10 or feel the overwhelming compulsion to revere the carvings for 2d7 minutes.  Thereafter they must make a Will save DC 10 everyday or be compelled to return to the Temple as swiftly as possible to pray.  After failing 3 times a final Will check DC 15 must be made.  If this check is made the creature will refuse to leave the mine area and become a servitor of Chaos, going mad but gaining Darkvision and 1d3 to all stats. 

The doors on the east wall are 15' tall and made of thick bronze.  They are sealed with a platinum chain and clay seal.  The chain is intricately carved and obviously very valuable.  It would fetch upwards of 700 GP in a large town.  The clay seal is easily broken.  This, however, will draw the ire of the two Baby Shadows who guard the Temple.  In fact, any defacing, mockery or expression of an opposed faith or belief system will alert the Shadows and cause them to attack. 

Baby Shadow (2): Init +3 (able to always surprise); Atk debilitating touch +6 melee (1 Str); AC 13; HD 2d8 (8 hp); MV fly 40’; Act 1d20; SP stalk prey to guarantee surprise, incorporeal, immune to non-magical weapons, un-dead traits; SV Fort +2, Ref +4, Will +3; AL C.

Once the seal is broken, the bronze doors can be opened with the application of at least 30 points of Strength.

17.  The Great Staircase.  A marble staircase descends down into the depths of a large cavern.  The stairs go on for as long as the DM wants them to but certainly beyond the initial visibility of the party.  Any creature who steps out on the steps will draw the attention of Manbats(4) (Init +4; Atk bite +6 melee (1d6); AC 12; HD 2d8 (9, 8, 8, 7 hp);MV 20’, fly 40’; Act 1d20; SP carry off prey; SV Fort +1, Ref+4, Will +2; AL C.) who will attack in 5 rounds.  They will each attempt to carry off a meal and retreat out into the darkness.

18The Underdark, The Abyss, The Lost World, Wonderland or New Jersey....your choice!


Thursday, February 27, 2014

The House of the Falerii

Here is a sister map to The Tomb of the Falerii.  The adventure is written to be a prequel, but could easily be adopted as a sequel or loosely related adventure locale.  


The House of the Falerii

Jackal Monkeys (23 total) live in areas 2, 3, 4, 5 and 10.  They will harass anyone who intrudes on their territory.  Typically they will throw their feces from a distance, only attacking physically if one or two party members get separated from the group.  They can go in and out of the arrow slits at will.  The Jackal Monkeys are fond of shiny objects and some treasure is scattered about their lair areas.  Typically this requires a search through dung piles which have a 20% chance to contain rot grubs (burrow to heart in 2d5 rounds.  Fort Save DC 20 or die.  Can be burned in first 2 rounds causing 1d6 or cut out in first 5 rounds causing 2d6 damage).


Jackal Monkeys: Init +2, Atk bite +2 melee (1d4+1), or thrown excrement +3 missile fire (dmg special); AC 14; HD 1d8; MV 30' or climb 30'; Act 1d20; SP Leap up to full movement; SV Fort +2, Ref +4, Will -1; AL N.

Throw Poo: Jackal Monkeys can (and often do) throw their own feces up to 40' at intruders into their territory.  The ordure does not cause physical damage but anyone hit must make a Fortitude save DC 12 or become nauseous (-1d on all attacks, ability, skill or spell checks) until the offending stool is washed off.  Subsequent poo-missiles have no further effect.

Leap:  The Jackal Monkey can leap using its powerful hind legs up to 30', consuming its entire movement for the round.


Jackal Monkeys are the result of bizarre experimentations by wizards in ages past.  Why any magic user powerful enough to conduct such experiments would choose two of the most annoying animals in the history of mammal-dom to combine is a mystery.  Perhaps the plan was to unleash them as a plague upon a rival nation or they are simply an attempt at a practical joke by a half-mad archmage with too much time on his hands.  Either way, they present a definite annoyance, and potential danger to unprepared adventurers.

1.  Entry.  The powerful bronze doors are still intact, requiring tools or a key to open.  Any creature spending more than a few rounds in this area will draw the attention, and subsequent thrown manure of the Jackal Monkeys.

2.  Tower. Dung Pile: Silver Ring (15 GP), 40 GP in assorted coins.

3.  Fortified Hallway.  There is a hidden 20' pit trap (2d6 damage).  Reflex DC 14 to avoid.  The lid is hinged and on a surprisingly still working spring.  Several Jackal Monkey corpses are in the pit. 

4.  Tower.  The door to 5 has fallen off the hinges due to exposure.  Dung Pile: Gold Necklace (45 GP), Platinum cloak pin with inset ruby (60 GP).

5.  Stable Yard.  The large gate is warped and open.  It could be jury rigged to close again with a little effort.  In addition to the Jackal Monkeys that inhabit the yard, 5 Giant Rats: (Init +4; Atk bite +2 melee (1d4+1 plus disease); AC 13; HD 1d6+2; MV 30’ or climb 20’; Act 1d20; SP disease (DC 7 Fort save or additional 1d6 damage); SV Fort +4, Ref +2, Will -1; AL N.) live in the dark corners of filthy enclosure.  The stairs on the southern wall lead up to the battlements.

6.  Entry Hall.  The pool is dark, stagnant and 2' deep.  Anyone feeling around the bottom with their bare hand has a chance (Luck check) to pull up a random coin.

7.  Secret Stairs.  To anywhere you like!

8.  Child's Play.  A little girl sits alone in this room playing with her dolly.  She is a ghost but seems real.  An observant character may notice that a scarf the child wears conceals a ghastly and fatally deep gash across the throat.  The child will readily talk to adventurers claiming that "Mommy said if I was a good girl and stay weally, weally quiet I could have a sweet.  Did you bring me a sweet?  I tried to be quiet Mommy...I tried to be quiet..."  Anyone giving the child a 'sweet' gets a +2 to any save for 3 days, afterward the child will disappear.  Anyone being a 'meanie' will cause the child to wail a baleful curse causing 1d3 Personality loss.  Willpower DC 14 to resist.

9.  Empty Room.  ...

10.  Observation Room.  Dung Pile: 100 GP in assorted coins.

11.  Chamber.  3 Ghouls (Init +1; Atk bite +3 melee (1d4 plus paralyzation) or claw +1 melee (1d3); AC 12; HD 2d6; MV 30’; Act 1d20; SP un-dead traits, paralyzation, infravision 100’; SV Fort +1, Ref +0, Will +0; AL C.) have gained access to this room via the secret door and made it their lair.  A pile of bones in the western nook contains 80 GP in assorted coins and a fine dagger (+1 to hit and 1d5 damage).

12.  The Baths.  These rooms were once opulent, marble baths.  Water randomly, but steadily, drips from the ceiling throughout the chamber.  The dark pool is now home to a giant water moccasin (Viper, giant: Init +6; Atk bite +8 melee (3d6 + poison DC 12 Fort or 1d4 Stamina); AC 16; HD 4d8; MV 30’; Act 1d20; SV Fort +6, Ref +4, Will +2; AL N.).  The northwest corner was once the privy and there is a concealed hole that the snake will use to retreat to the tunnel at 17 if the situation turns dire.

13.  Steam Room.  The natural fissure in the floor here permits a pleasant steam to periodically vent into the room.  Less pleasant are the two Steam Devils (Init +2; Atk bite +4 melee (1d6+2) or breath weapon - 20' cone of steam, Ref DC 12 or 2d6 damage; AC 12; HD 2d6; MV 40’; Act 1d20; SP immune to damage from fire or heat; SV Fort +1, Ref +2, Will +1; AL L.) that now make this room their home.  If slain they will explode in a burst of steam causing 1d8 damage to all within 5'.

14.  Dining Room.  The statue at end of hall is of toga-clad woman holding an amphora pouring into a basin.  It is dry.  5 command words in ancient common (Intelligence DC 15 or related to decipher) are chiseled into the base.  When spoken a liquid magically pours from the amphora into the basin.  It is enough to fill 1 Waterskin.  The liquid will drain away in 1d3 rounds unless captured in a vessel.  The statue can produce 10 times per day, regardless of the combination of the following: 
                                              1.  Water (potable)
                                              2.  Wine (Excellent quality.  Made from grape that is extinct.  15 GP per wineskin)
                                              3.  Vinegar (1 skin of vinegar will dissolve 10' cube of spider webs in 16 if splashed on them)
                                              4.  Honey Milk (counts as a 'Sweet' for encounter in room 8)
                                              5.  Garum (a foul smelling fish sauce - tastes delicious though!)

15.  Servants Corridor.   This area would provide a safe and quiet place to rest.  There is even a fully stocked kitchen, although all of the foodstuffs have been eaten by vermin long ago.

16.  Temple of the Falerii.  The columns and vaulted ceiling have been inhabited by several generations of Giant Spiders (Init +1; Atk bite +3 melee (1d4 + poison); AC 12; HD 2d8; MV fly 30’; Act 1d20; SP poison (DC 8 Fort save or death); SV Fort +2, Ref +3, Will +1; AL L.).  4 such live here now.  Hidden completely by the vast amount of webs are the many corpses of their past victims.  Two are, or were, humanoid and some of their treasure is still cocooned with them.  One has a scroll of Haste and a Magic Cloak (+2 to all Saves)made of human skin (-2 to all Reaction rolls with Humans).  The other has a golden statue worth 100 GP with glowing green jewels for eyes.  The 'eyes' can be removed and permanently shed an eerie green light in a 20' radius unless covered.  If the webs are burned, only the statue will survive the flames. 

The altar contains a platinum service worth 250 GP for the metal alone but upwards of 1,000 GP if the right collector can be found.  There is also a secret compartment in the right side (isn't there always) that contains a Magic Ring which will grant the wearer the ability to cast Word of Command as per the Cleric spell with a Spell Check of +5, twice per day.  There is no penalty for failure.  The ring also functions as a Ring of the Falerii for the related adventure, The Tomb of the Falerii (http://thecastellanscorner.blogspot.com/2014/01/the-tomb-of-falerii.html).

17.  Sewer.  A fine trickle of water runs from the baths in 12 down the center of this sloping tunnel.  It empties into a river about a half mile to the west.